Metro Prepaid Sub Meter Installation
Step 1: Take off the cover of the electric sub meter by removing the screws first then put it aside.
Step 2: Loosen all the screws on each terminal
Step 3: Connect the first wire which is live (brown cable) and screw it in the terminal of the electric sub meter, ensuring the cable is tight.
Step 4: Connect the second wire which is neutral (blue cable) and screw it in the terminal of the electric sub meter, ensuring the cable is tight.
Step 5: Connect another neutral (blue) cable to the terminal of the sub meter and ensure it is tight by screwing it in properly.
Step 6: The last wire to be connected to the terminal is another live (brown) cable, also ensuring it is screwed on tightly on the electric sub meter.
So, from the main distribution board there will be the live and neutral wire from the main breaker. Then to the sub unit, there will also be the live and neutral wire on an additional breaker.
The sub consumer unit will also illustrate this as indicated in the above video, where the breaker connects to plugs, lights and appliances. Should there be any problems it acts as a safety mechanism and the breaker will trip instead of the electrical sub-meter.
Step 7: Once you are done with the wiring and they are secure, put the cover back on over the terminal of the electric sub meter and ensure it is also tightly screwed on.
Step 8: Switch the power on, check the connection and ensure the electric sub meter works.
Step 9: Punch in “12345” into the sub meter and then press “enter” (blue button) - this will activate the temper switch and unlock the Metro Prepaid electric sub meter.
Step 10: Electricity supply is now active and your consumer unit, lights, plugs and appliances will be able to work once you have bought your Metro Code.
And that is how a sub meter installation works; you will also get seals with it to ensure that tenants do not tamper with the sub meter.
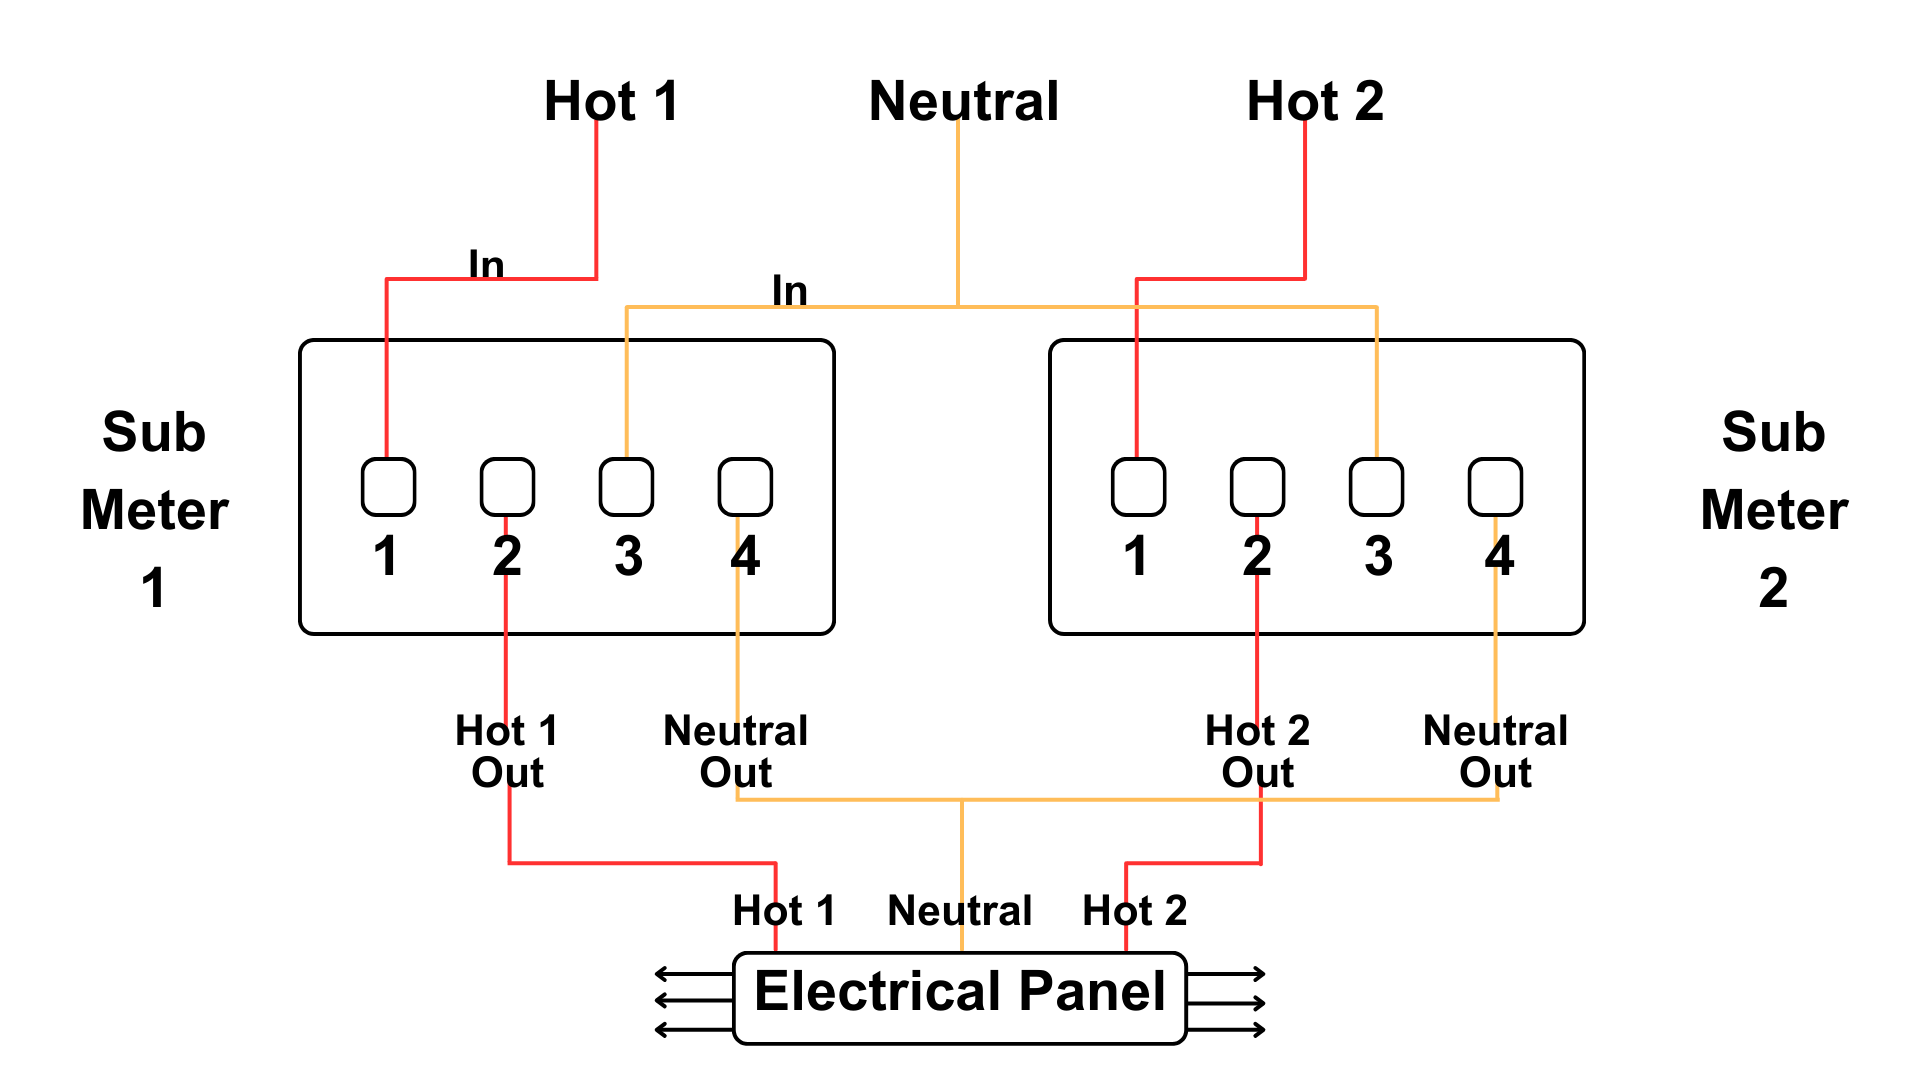
How to install two electric sub meters in one ADU

Step 1: Turn off the main power at the electrical panel to ensure safety while working.
Step 2: Remove the covers from both sub meters by unscrewing them, then set them aside.
Step 3: Take the Hot 1 wire (usually red or brown) from the electrical panel and screw it into terminal 1 of Sub Meter 1. Make sure it’s secured tightly.
Step 4: Take the Neutral wire (usually blue) from the panel and connect it to terminal 3 of Sub Meter 1. Tighten the screw to secure the wire.
Step 5: Now connect a second wire to terminal 2 of Sub Meter 1, which will be the Hot 1 Out wire going back to the unit. Ensure this wire is firmly secured by tightening the screw.
Step 6: Connect the Neutral Out wire to terminal 4 of Sub Meter 1 and tighten it to make sure it’s fixed properly.
Step 7: Repeat the same process for Sub Meter 2. Connect the Hot 2 wire from the electrical panel to terminal 1 of Sub Meter 2 and secure it tightly.
Step 8: Take the same Neutral wire you used for Sub Meter 1 and connect it to terminal 3 of Sub Meter 2. Screw it in securely.
Step 9: Connect a second wire to terminal 2 of Sub Meter 2 as the Hot 2 Out wire, ensuring it’s tightly in place.
Step 10: Finally, connect the Neutral Out wire to terminal 4 of Sub Meter 2 and screw it in properly.
Step 11: After all connections are secure, put the covers back on the sub meters, turn the power back on at the main electrical panel, and test the meters to ensure they’re working.

Where to buy your Metro Prepaid Electric Sub Meter?
Metro Prepaid Electric Sub Meters are now available online visit our Products page or at a wide range of electrical wholesalers throughout the United States.